
It is possible to delay the delivery of an individual message or messages using Microsoft Outlook, after you have clicked Send.
To delay the delivery of an individual message, follow these steps:
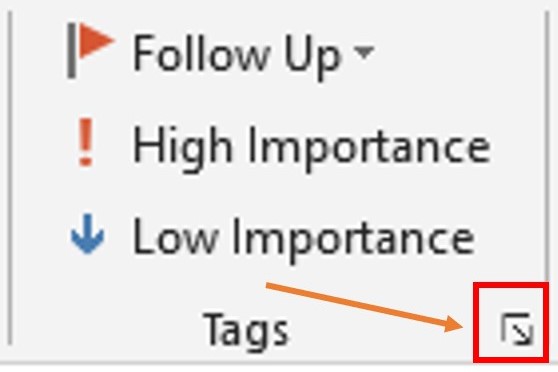
- When you have composed the message, on the Message Tab select the Launch Dialog-Box arrow in the bottom right of the Tags group.
–
- In the Dialog-Box that appears, in the Delivery options section, tick the Do not deliver before check box, and then choose the date and time when you want your message to be delivered.

- Close the Dialog-Box.
- Once you’ve finished composing your email message, click Send.
The message will remain in Outlook’s Outbox until your chosen delivery time.
If you later decide you want to send the message earlier than scheduled time, follow these steps:
- Locate the Outbox folder, in the Folders Pane at the left-hand side of the Outlook window and double-click it to view any messages it contains.
2. Find and open the delayed message.
3. On the Message Tab select the Launch Dialog-Box arrow in the bottom right of the Tags group.
4. In the Dialog-Box that appears, in the Delivery options section, untick the Do not deliver before check box
5. Close the dialog box and click Send.
NB: For this feature to work, Outlook must be online and connected.
There are many other options that you can use in Outlook, including setting a rule to delay all messages being sent by a specific amount of time. Contact us to find out more about our Outlook courses at all levels.
0 Responses to “Use MS Outlook to Delay or Schedule Emails”
Leave a Reply