Author Archive for Simpson

Microsoft Outlook Tip: Creating Email signatures

In this tip, we will guide you on how you can create your own personal email signature which can be added to the end of each email that you send from Microsoft Outlook 2007 and 2010. A new start for a New Year!


Having a signature which contains your contact details means that the recipient is more likely to remember your details, especially if you have a healthy backward-forward dialogue going with them through emails. The recipient will also know who they need to talk with and their position within the company, ensuring that they are dealt with by the right person and in the most effective way.


Microsoft Outlook Tools


To set up your own custom Microsoft Outlook signature in 2007, follow these simple steps:


  • Select Tools > Options > Mail Format tab.
  • Click Signatures > and go to the E-mail Signature tab > New.
  • Type the new signature’s desired name.
  • Click OK.
  • Type the desired text of your signature under Edit signature.
  • You can use the formatting toolbar to format your text, or insert an image in your signature.
  • Click OK.


Email Signiture 1

To set up your own custom Microsoft Outlook signature in 2010 , follow these simple steps:


  • Select the Home tab > and click New Email.
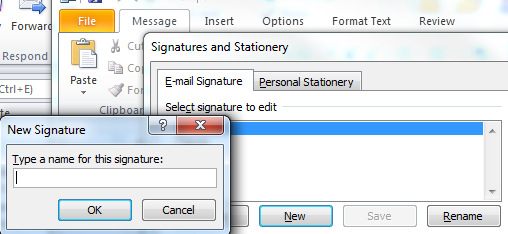
  • In the Message tab > Signature > and click Signatures.
  • This will bring up a Signatures and Stationery box.
  • Click New and type the name of what you wish to call your signature, and click OK.
  • Type the desired text of your signature under Edit signature.
  • You can use the formatting toolbar to format your text, or insert an image in your signature.
  • Click Save > OK.

Email Signiture 2


If you would like to read more Microsoft Outlook tips, please visit our Outlook Tips page.


If you would like to learn more about Microsoft Outlook, then you should book yourself on one of our Microsoft Outlook Training Courses. Just give us a call or drop us an email; we are more than happy to help!

Microsoft Visio Tips: Stacking Order

Visio is used to create Flowcharts, Organisational charts and floorplans. This means there may be lots of different shapes on the screen at one time.


In Visio, shapes can be places one on top of the other on a drawing page. The order in which shapes are place one over the other is the stacking order. A selected shape can be sent to the top or bottom of the stacking order, or moved one place forward or backward in the stack.


Stacking order 1


To change the stacking order of a image you can do the following:


On the Home tab, in the Arrange group there is a Send Backward and Bring Forward button like in the picture below.

Stacking order 2


Or you can right click an image and choose the same options like in the image below.


Stacking order 3


This can be done in Microsoft Visio 2007, 2010, and 2013.

Microsoft Outlook Tips: Auto-Replies

With how busy people are getting in the working day, sometimes it’s just too hard to reply to an email. Microsoft Outlook 07/10/13 gives you the opportunity to send an automatic reply if certain “rules” are met.


The first way to do this is by using the built in “Out of Office” feature. This only works when you are connected to a Microsoft Exchange Server account. To set up your Out of Office Feature you must do the following:


  1. Click File > Automatic Replies.


If you don’t see this command, you probably don’t have an Exchange Server account.


  1. Select Send automatic replies.


  1. If you want, select the Only send during this time range check box to schedule when your out of office replies are active. If you don’t specify a start and end time, auto-replies are sent until you select the Do not send automatic replies check box.


  1. On the Inside My Organization tab, type the response that you want to send to teammates or colleagues while you are out of the office.


  1. On the Outside My Organization tab, select the Auto-reply to people outside my organization check box, and then type the response that you want to send while you are out of the office. Select whether you want replies sent to My contacts only or to Anyone outside my organization who sends you messages.


You may not be using an Exchange server account for Outlook and if this is the case the above steps will not work. The steps below are how to create an Automatic reply using rules for Outlook.com (formerly Hotmail), POP3 and IMAP email address.


Firstly you need to create an email template.


  1. Click Home > New Email.

Auto-Replies 1


  1. In the message body, type the message that you want to send as your automated reply.


  1. In the message window, click File > Save As.


  1. In the Save As dialog box, in the Save as type list, click Outlook Template.


  1. In the File name box, type a name for your message template, and then click Save.


Now, create a rule to automatically reply to new email messages.


  1. Click Home > Rules > Manage Rules & Alerts.


  1. In the Rules and Alerts dialog box, click New Rule.


  1. Under Start from a blank rule, click Apply rules on messages I receive, and then click Next.


  1. Under Which condition(s) do you want to check?, check any criteria that you want, and then click Next. Typically, you don’t need to check any items.


  1. Under What do you want to do with the message?, check reply using a specific template.


  1. Under Step 2: Edit the rule description (click an underlined value), click a specific template.


  1. In the Select a Reply Template dialog box, in the Look In box, click User Templates in File System.


  1. Select the template that you created in the previous section or one that you have created or downloaded, and then click Open.


  1. Click Next.


  1. Check any exceptions to the auto-reply rule. It’s common not to add any exceptions.


  1. Click Next.


  1. Under Step 1: Specify a name for this rule, type a name for the auto-reply rule, and then click Finish.


Microsoft Word Tips: Saving a Document in a Different Version


If you have an older version of Microsoft e.g. 2003 and you get sent a document from a newer version i.e. 2007 you won’t be able to open the file. If you don’t want this to happen there are two things that you can do.Microsoft Word 2007 Save As


  1. You can Upgrade to the newer version if you wish
  2. Or you can ask the sender to Save It In a Older Version and then send it back


If you want them to resend the document back to you in the 2003 version here’s how they can do it


  1. Click on the Office Button then go down to Save As
  2. Move your mouse onto the arrow next to Save As
  3. Choose the same version that you need (Word 97-2003 Document)
  4. Then click on Save


The sender can then send it to you in the format you can read.


Visit our Microsoft Word Tips page for more useful Tips 🙂

Microsoft Access Tips: Validation Rule

Access is designed for users to enter data into a database easily but sometimes people type in the wrong data and this can affect the tables and final reports.In this blog post we will be looking how to create a Validation Rule in Access 2007, 2010, and 2013.


To stop this you are able to implement Validation Rules to stop this from happening. The Validation Rule limits the values that can be entered into a field. So for example you are able to stop a number greater than 100 being entered in.


You can put a validation rule on any field in a table and this is found on the design view of that table, under the general tab.


Validation Rule 1


You can see there are 2 fields for Validation, Rule and Text. The rule is where you put in your “Rule” here are some examples below:


Rule Explanation
>30 Only numbers greater than 30
<20 Only numbers less than 20
Between 20 and 30 Numbers between 20 and 30


Validation text is where you put the text for the message box that will appear if the rule has been broken. This can be any message and you will always get a OK, Cancel Message box that will appear.


Validation Rule 2

Microsoft Excel VBA Tips: How to make a message box

Using Visual Basic of Applications can make your Excel workbooks a lot more user friendly and functional. In this blog post we will be looking how to create a message box in VBA for Excel 2007, 2010, and 2013.


The first message box we will be creating will be a small message box which shows the text “Hello World”. Before we can do this, we need to enable the developer tab on the ribbon. To do this you need to Click on File > Options > Customise Ribbon > and then check the developer tab like in the image below.

 How to make a message box 1


So on the developer tab; on the left hand side you can see a coding section. This is where you can easily access the Visual Basic Software, Macros and other options.


How to make a message box 2


Clicking the Visual Basic button will open up the Visual Basic Software. When making a message box, you are unable to record a macro to make this for you. You will need to type code to do it.


Here is what the Visual Basic Software looks like.


How to make a message box 3


To write some code we need to create a module to hold the code. To do this go to the top bar, click on Insert > Module


How to make a message box 4


Once you have done that you need then to create a Procedure to hold the Message Box.

Click Insert > Procedure > Type a name > Leave it set to Sub and Public > Click OK.

Note: The name cannot have a space in it.

How to make a message box 5


In the Coding window you can then type the following to create a message box


 How to make a message box 6


To run the Procedure/Macro, go back to your Excel window. This can be done by either closing the VBA window or just minimising it.


On the Developer tab > Click on Macros and the new HelloWorld Procedure/macro will be in here.


How to make a message box 7


Highlight the HelloWorld Macro and click run. You will get a little message appear with your message inside!


How to make a message box 8

Microsoft Project Tips: Schedule, Auto or Not?

So you have been asked by your Line Manager / Director to start planning a Project in Microsoft Project. You get all the information you need, write it all down and then you are ready to sit down and start adding your Tasks and Resources into your new project. One of the first problems you will find when making a Project is to either select Auto Schedule or Manual Schedule.


So what is the difference between these 2 settings?

Schedule 1


Manual Schedule is the default setting for all New Tasks when you create a brand new project. And you can see from the image on the right what the tool tip is for this setting.


It updates the selected tasks to be manually scheduled so that the values you enter for Start, Finish and Durations are not automatically updated.


As you can see above it doesn’t update the Start, Finish and Durations of each task that has this option.


Schedule 2


Auto Schedule is a little bit different then Manual Schedule and you can see the main difference in the screenshot on the left.


It automatically calculates the Start, Finish and Duration values for this task based on dependencies, constraints, calendar and other factors.


So you can see the difference straight away. If you want Microsoft Project to put in Start dates, Finish Dates (depending on the Task duration) and if you want it to change depending on other tasks moving, extending, different constraints etc, auto scheduled will do it for you. Around 90% of your tasks would be best to be set as Auto Scheduled as it takes a lot of the problems when you need to change Tasks around/insert new tasks etc.


There is a couple of ways you can do this:

  1. You can write your tasks on your project, highlight them all and then on the Ribbon navigate to the Task Tab > Tasks Group and click on Auto Scheduled (or Manual Scheduled).


Schedule 3


  1. You could also do it by making sure you are in the Gantt Chart View > Navigate to the Task Mode Column and change the option in there as shown in the screenshot below.


Schedule 4

Microsoft PowerPoint Tips: Insert Media

You’ve got a very important presentation coming up in the next few days! You presentation is completed with all the information you want to deliver but you feel it has something missing? Why not spice up your presentation with a Video or with Audio?


Inserting Video and Audio on PowerPoint 2010 is a very simple task.

Insert Media 1


Navigate to your Insert tab on the ribbon and on the far right of this tab is your Media Group as seen in the image above.


This group is broken down into a separate section for Video and Audio.


Insert Media 2

Under the Video option you have 3 options to choose from:


Video from file: This allows you to import a video from your computer.


Video from Web Site: This allows you to embed a video from a website like YouTube.


Clip Art Video: This allows you to import a video from the offline/online clip art gallery.


Insert Media 3

Under the Audio Option you have 3 options to choose from:


Video from file: This allows you to import an audio file from your computer.


Clip Art Audio: This allows you to import an Audio file from the offline/online clip art gallery.


Record Audio: This allows you to record Audio in real time and insert straight into the PowerPoint.


Once the video or audio file is in, you are then able to modify it your hearts content.

Microsoft Word Tips: How to continue numbering

Numbering in word is easy as 1, 2, 3! In word documents you are able to use either Bullet Points or Numbers to make text jump out of the page. As you can see below it makes a list easier to read and brings the reader in!
1.    Make a Blog Post
2.    Upload it  to the Blog
3.    Profit!!!


But what happens when you want to stop the list, type a paragraph and then continue where the previous list left off?


You get to your numbering section you need to go to the Home tab, Paragraph Group. And located at the top left of this group are the bullets and number command buttons.Numbering 1


To turn the Numbering on click on the Numbering Command button in this group and to turn it off you can click it again and this will turn off the number on that line.

If you want to then re-continue your numbering later in the document, repress the Numbering Command button.
Numbering 2

You will see next to the new number a Lightning Bolt icon, this icon is a menu that will either show you 1 of 2 options: Continue Numbering or Restart Numbering. Select the option that you need and carry on typing.

Funding Opportunity: 50% off Training

We regularly review opportunities for our clients to get the best out of training and we came across the following funding, which helps companies to up-skill their IT force.


The objective and purpose of this funding is to increase the investment in IT training, which stimulates business growth and competitiveness. This, in return, will create a highly skilled force and therefore attract more business and investment which will boost UK economy.


Funded Courses
Funding is available for employers wanting to invest in the following strategic skills area:

  • Cyber Security, eg: CompTIA Security +
  • Network training, eg: CCNA, CompTIA Network +
  • IT infrastructure, eg: Microsoft Server
  • Data Management, eg: Microsoft Dynamics, SQL Server
  • Other courses, eg: Exchange, SharePoint, VBA and more CompTIA courses

Employers may apply for up to 50% of the costs of training, up to a maximum of £500 per learner for each course applied for.


Eligibility
The main eligibility criterion of employers is as follows:

  • The business is based in England and the training is delivered in England
  • The training would not have taken place without the support of the fund, and has not already started.


For more details about the funding and eligible courses, please contact us on 0115 958 6699 or email info@inferotraining.com