Monthly Archive for May, 2020

Uncanny PowerPoint Facts

PowerPoint Collage


PowerPoint is used in Businesses, Schools and many other places. It is an incredibly versatile and powerful tool and can be used, among other things, to make social media images, YouTube videos, infographics, business cards, visual CVs, logos and photo collages.


For something that is so widely used, however, there are some things that not many people know about the world’s leading presentation app. Here are some suprising facts about PowerPoint:


  • PowerPoint was designed for Apple, not Microsoft and was initially only available on Macintoshes.
  • It was originally called “Presenter”, but because of Trademark issues the software’s name was changed to PowerPoint in 1987, which was the same year that Microsoft bought the application for $14million.
  • Approximately 35 million PowerPoint presentations are given every day by 500 million users worldwide.
  • The average PowerPoint slide length is 40 words, but it should be remembered, in PowerPoint Presentations, that LESS is more.
  • It is possible to use a ‘virtual’ laser pointer in PowerPoint, but this only works in presentation mode.
  • Most people tune out of a presentation after only 10 minutes. (To avoid this, the secret is to re-engage the audience with a poll, questions or some sort of activity.)
  • Powerpoint (like Word and Excel) can combine separate shapes into one custom shape. Effectively PowerPoint can be a vector art tool.
  • Preparing a presentation takes on average 2 hours of time for a normal employee.
  • One of the most annoying things about PowerPoint Presentations are presenter who just “read” the text on their slides. Only putting keywords on slides helps to avoid this.
  • PowerPoint Karaoke is a real thing! To play, presenters deliver a completely unknown presentation (without seeing the slides beforehand) and try to make it look they know what you are talking about.
  • PowerPoint includes functionality to take screenshots, remove photo backgrounds, create amazing animation and transition effects, take screen recordings, reshape photos into any shape and even use video as a background.


Infero offers course on PowerPoint at all levels, that help you unlock this functionality and provides tips on making your PowerPoint presentation stand out from the rest.

The Top Ten Interesting Facts About Microsoft Word

MS Word Collage


Microsoft Word had been around for a while now. In fact it is nearly forty years old. But there is a lot more to know about Word than that. We’ve collected together some interesting and fun facts that might surprise you.


  1. Word was launched in 1983, around the time that wearing a seat-belt became compulsory in the UK, when it was called Multi-Tool Word.
  2. It was one of the first word processors to have a What-You-See-Is-What-You-Get (WYSIWYG) interface. What appeared on the screen looked the same as what was printed. Before this, mark-up tags needed to be added to indicate different typefaces.
  3. Like Excel, Word was released for the Apple Macintosh years before there was a version for Windows.
  4. Early versions of word had interesting codenames, including Bill the Cat (for Word 1.1) and Spaceman Spiff (Word 2.0).
  5. AutoCorrect was only included with Word 6.0 in 1993. Before that users had to correct their own typing, spelling and grammar mistakes!
  6. There was a free download of Word released as a fail-safe against the much-feared Millennium Bug – Word 5.5. for DOS. (If you look hard enough, it can still be found on the company’s website.)
  7. It is possible to include most kinds of Equations in Word. (-b±√(b^2-4ac))/2a).
  8. There is a ‘Hidden’ option for text, so that it not only cannot be seen, it does not take up any space. You can still use ‘Find and Replace’ with hidden text, though.
  9. There are shortcuts for selecting in Word. Two rapid mouse clicks will select a word. Three rapid clicks will select an entire paragraph and CTRL + Click will select a sentence.
  10. It is possible to use Macros to automate Word. They are not just available in Excel.
  11. Bonus Fact:  According to Microsoft’s latest figures, there are currently 1.2 billion Office users worldwide. If all of them typed just ten words, then it would take one person 110 years to read them all, at average reading speed.


There is so much more that Word is capable of doing. Infero offers Training courses at all levels to help get the most out of this remarkable piece of software.

Six Steps For A Perfect Interview

free-to-use-sounds-now-hiring-infero-training


In a previous blog, we looked at how to prepare for an interview, but it is the interview itself that really matters. When the interview day arrives, you need to ensure that you stand out from all the other candidates. This is easier than you think. Here are a few simple guidelines that will ensure that your interview goes well:


1. Practice Good Non-Verbal Communication


Demonstrate confidence from the start of the interview. Stand up straight and make eye contact. Greet all the people interviewing you with a smile and a firm (not crushing) handshake. Non verbal impressions are incredibly important and can give a great beginning to your interview.


2. Listen


Interviewers will give you information during the interview, either directly or non directly, so make sure you listening. An interviewer will want to know that your communication skills include listening, so it is important to let the other them know that you heard what they said. Match the style and pace of the interviewer, if that is possible. This is extremely important when responding to specific questions. You will have done your homework and prepared answers, but make sure that the question being asked matches the answer you have prepared. Listen carefully and answer the question that the interviewer has asked.


3. Don’t talk too much


It sometimes feels that you have said too little in answering a question, but don’t say too much. Long rambling answers that end up going nowhere are not a good idea. When preparing, you will have thought of specific, precise answers to questions. Give the interviewer only the information they need to answer that specific question and show you know exactly what you are talking about. Match your skills with the position’s requirements and relate only that information.


4. Don’t be too Familiar or Overconfident


The interview is a professional environment and the interviewer wants to see that you can be professional. Remember, you are not there to be the interviewer’s friend. Take your cue from the interviewer, be energetic and enthusiastic, but remember you are a candidate looking for a job. Make sure you use appropriate, professional language.


And remember, you are there to sell yourself, but try to get the balance between confidence and modesty right. Overconfidence can be worse than not highlighting your skills and abilities.


5. Ask Questions


At the end of the interview, when you are asked, “Do you have any questions for us”, make sure that you have prepared some in advance and ask these, to demonstrate an interest in what goes on in the company. Asking questions also gives you the opportunity to find out if this is the right place for you. The best questions are those that arise from listening carefully to both the questions that have been asked, and the things that the interviewers have said, and then asking for additional information.


As your last question, let the interviewers know you’re very interested in the job and ask when they think that they will be getting back to candidates.


6. Tell the Truth


It may seem obvious, but don’t lie, or be scared to admit that you don’t know something. Express your interest in learning or advancing in an area. If you have begun to look into something, tell them that, or try to ask a good question around the subject. Just don’t lie. No employer expects you to know everything. Admitting you don’t know is better than pretending that you do.


Bonus Do’s and the Don’ts


  • Do dress stylishly and job appropriate.
  • Do make eye contact. But don’t overdo it.
  • Do take time to consider your answers and respond thoughtfully.
  • Do take time for pleasantries.
  • Do use job appropriate language and well-placed jargon.
  • Do be yourself.
  • Do clearly define your reasons for wanting the job.
  • Do speak clearly, at a normal conversational pace.
  • Do remember that’s it’s ok to be nervous, as long as nerves don’t get the better of you.
  • Don’t get flustered if you slip up on a question.
  • Don’t speak ill of former co-workers, employers or colleagues.
  • Don’t reveal unnecessary personal information.
  • Don’t forget to highlight your biggest strengths.
  • Don’t tell jokes. They can fall flat.
  • Don’t panic. You will do great!


Remember, despite what you think, interviewers want you to do well. They are waiting for a great candidate and there’s no reason that shouldn’t be you.

12 Unbelievable Facts About Excel

Many of us use Excel everyday and we think that we know it very well, but just how well do know Excel? Even when you have had Excel training, facts about it that are not widely known and that are almost unbelievable. Here are 12 incredible facts about Excel:


  • Excel has been around since 1982, but it was originally called Multiplan and only became ‘Excel’ in 1985
  • The first version of Excel proper was only available for Macs and not for Windows
  • An Excel Cell can contain up to 32, 767 characters
  • There are 17,179,869,184 cells on a normal worksheet. At one second a cell, it would take 545 years to completely fill a worksheet.
  • The earliest date that can be used for calculations is the 1st of January, 1900
  • 16% of the world’s population use Excel
  • In Excel, it is possible to undo the last 100 actions
  • It is not possible to name a worksheet “History” in Excel.
  • There are more than 500 keyboard shortcuts in Excel.
  • The maximum number of worksheets in an Excel workbook is only limited by available memory.
  • It is possible to use up to 512 different fonts in an Excel worksheet.
  • Up to 4,000,000,000 formulas can depend on a single cell


16 Percent


Excel is an incredible application and can do some amazing things, but the facts about it are even more unbelievable.

The 5 Things You Must Do to Prepare for a Job Interview

tim-gouw-interview-preperation-infero-training


It doesn’t matter how many of them you have done, an interview is always a challenging thing. How should you prepare best for a job interview, once you have secured one? There are some things that most experts in the field agree on and they are all fairly simple. Here are the five things that you must do when preparing for that important interview.


1. Research the Company


Research the employer (and industry, if possible). The question “What do you know about this company” may be asked during the interview, even if it seems casual and throwaway.  It is important to display interest and knowledge. Use the company’s website to find out information on the company’s history, mission and values. Look at a company’s blog and social media presence also


2. Practice and Prepare


Carefully review the job description and look up anything you don’t understand. Know exactly what the job is and what it entails. Make a list of the job’s requirements and match them to your experience. Check typical job interview questions and try to think of any that might be applicable to this particular role. Work out your answers to these questions. Strong answers will be specific but concise, drawing on real examples of your skills and experience, emphasising the things most relevant to the position.

Practice answering the questions. Use a mirror, a recording device, or ask friends or family to mock interview you. The trick is to get comfortable with talking about yourself without sounding too confident, or, perhaps even worse, too self-conscious.


4. Get Ready Before The Day of the Interview


Make sure you have an interview outfit ready the day before the interview. Whatever the position, ensure that you are smart, neat and tidy and appropriate for the firm where you are being interviewed. Always err on the side of being too smart. Prepare a folder, or Portfolio, with extra copies of your CV and a pen and paper for taking notes.


5. Be on Time


Being on time for the interview means being early i.e. at least five to ten minutes before your interview time. Drive to the interview location the day before, if this is required, but take account of the difference in traffic there may be on the actual day. Err on the side of being too early. You can always sit in your car in the car-park for a while if you have to. Give yourself time to calm your nerves if that’s required.

Some Bonus Dos and Don’ts


  • Do know your own CV. Most interviewers will probably have it in front of them at the interview.
  • Do quiz yourself in advance with practice questions.
  • Do spend time researching the market and the industry that the company is part of.
  • Do practice your interview skills with a friend or family-member.
  • Do prepare answers to common interview questions.
  • Do eat a healthy breakfast before going in.
  • Don’t stress yourself out by dwelling on negative possibilities.
  • Don’t be late because you get lost. Plan for delays.
  • Don’t schedule for late in the week. Studies say that the ideal time for an interview is 10:30 on a Tuesday, so don’t choose a Thursday or Friday, if you have the choice.
  • Don’t drink too much coffee or tea.


Next week, in the second part of this series, we will be looking at how to perform well when you get to the interview and how to ensure that you are successful.

The Top 10 Tips for a Job Winning CV

markus-winkler-Top-CV-Tips-Infero-Training


One of the hardest things to do when hunting for a job is to write a good CV. Some employers spend only a few seconds scanning a CV before deciding ‘Yes’ or ‘No’.


Here are our top 10 tips for writing a CV that will hopefully get you an interview


1. Tailor Your CV

For many, the number one thing that improves a CV is making sure that it is tailored for the job being applied for. Since so much job application is done online, it is very easy to send the same CV to every single vacancy. Don’t do this. Tailoring a CV may be more work, but a CV that doesn’t address the requirements of a particular role will be quickly discarded. Employers will also respect the effort that has been made. Tailor a CV by:

  • Researching the company’s website, blogs and social media profiles to know as much as possible about the organisation.
  • Writing down the specific requirement of the job using the job description.
  • Matching where skills and past work experience fit the job’s requirements.
  • Starting the CV with good examples of skills and industry knowledge that show you are a good fit for the role.
  • Removing anything irrelevant to the job.


2. Keep it Short

A CV should be no more than two pages of A4 paper. A long and detailed CV will almost certainly be quickly discarded. Include only the most important and relevant parts. Details can be given in the interview.


3. Write a Personal Statement
Explain clearly and concisely why you are the best person for the job. This can be expanded in a cover letter, but putting it at the beginning of a CV will catch the employer’s attention.


4. Check for Errors
Employers will notice mistakes on CVs and because they receive high numbers of applications will use them as an excuse to bin your application. Always, always use a spell checker and, if possible, get someone else to read what you’ve written before it’s sent.


5. Avoid Having Gaps
Any gaps in a CV will probably make a prospective employer suspicious. It is very tempting to try to hide these, but it is possible to put a positive spin on periods of unemployment, by saying the time was used to complete courses or to do volunteer work. There are positive things that can be done to advance professional development, even when not working, so highlight these.


6. Don’t Lie
Some people say that everyone lies on their CV, but that is not true. Lying might get you an interview, but it won’t help to answer questions on something that you’ve claimed to be an expert about.


7. Make Sure a CV is Up-to-Date
It sounds simple, but it is easy to miss adding recent skills and experience to a CV. Relevant recent experience is much more powerful than relevant experience from years ago.


8. Format, Format, Format
Ensure that your CV looks as good as it possibly can. Use clearly defined sections and bullet points where appropriate. Keep sentences clear and concise. Leave space between sections and make the layout of the CV as simple as possible.


9. Understand Keywords
We started by saying that some employers spend only a few seconds scanning a CV before deciding ‘Yes’ or ‘No’, but the fact is that some CVS are rejected before being seen by humans at all.


Because the vast majority of job application are now done online, many employers receive far more CVs than they can check through practically, so Applicant Tracking Systems (ATS), or ‘Resume Robots’ can reject up to 75% of CVs before getting to a person.


The ATS acts like a specialised search engine and a CV needs to written in a way that optimises its chances or getting ‘found’. Employers use key words to identify people with the required skills and qualifications. Note the keywords in the job advertisement and ensure they are part of your CV. Make sure that skills and experience documented in a CV is relevant (going back to tip number 1).


It is not quite as simple as this and dealing with Applicant Tracking Systems is another entire article, but following the above tips will help.


10. Check Again.
Double-check everything again before sending. Check that you have made the CV as relevant as possible. Spell check again, just to be sure. Make certain that you have attached all relevant attachments to an email.


And good luck

Using The Name Box in Excel

The Name Box in is an often-overlooked feature in Excel. In a programme so powerful, offering Pivot Tables and Formulas, it is easy to do so, but this small and ordinary looking box has a lot of features that can really simplify the use of Excel. It can find the address of a cell; help navigate within a worksheet or workbook, or even be used to select.


1. Use the Name Box to Find the Address of the Selected Cell


Name Box Location 
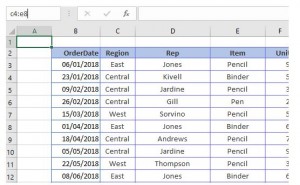
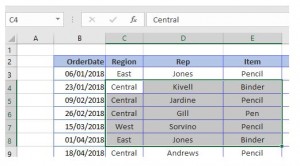
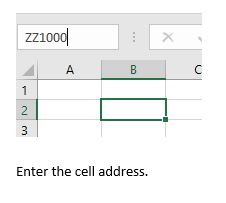
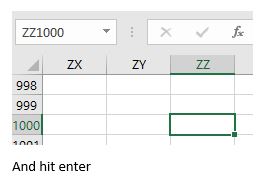
The name box is situated next to the formula bar in a worksheet and it displays the address of the currently selected cell or object.
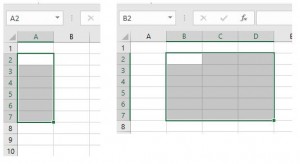
 

In the screen above, the Name Box is showing B3 because B3 is the currently selected cell. The address of any cell clicked upon will immediately display in the Name Box; useful if the cell is going to included in a formula.
The Name box won’t just give you the address of one cell. It can be applied to any group of cells too.


For instance:


Name Box 1


If a block of cells (a range) is selected, the Name Box will display the first cell in that range.


Name Box 2


If a non-contiguous range of cells is selected, the name box will display the first cell in the last part of the non-contiguous range selected. A non-contiguous range is a range that includes cells that are not all next to each other (contiguous). Hold down the Ctrl key whilst selecting to select multiple cells and ranges at once.


2. Using the Name Box to Select Cells


The Name Box’s functionality becomes really useful when, instead of just being used to check the cell address of a selection, it is used to make a selection. Selecting with a mouse can sometimes be difficult, especially for very large ranges or areas of a worksheet not currently in view.


By simply clicking into the name box, typing in the address of a cell, or range of cells, and then pressing Enter, Excel will automatically select that cell or range.


Name Box 3

Name Box 4.


Name Box 5


To Select a block of cells type the range into the Name Box, using a colon between the first cell address and the last cell address. (Notice that it is not necessary to use capitals when typing the cell references.)


Name Box 6


Press enter for Excel to select the range.


To select a cell or range of cells on another worksheet, type the name of the worksheet, followed by an exclamation mark and then the address of the cell, or range of cells. (E.g. Sheet4!A2:E8) into the Name Box and press enter.


There’s much more that the Name Box can do. Please check our next blog to find out.