Archive for the 'Microsoft Access Tips' Category

Microsoft Access Tip: Creating Relationships

A great tool in Access is Relationship; which is used to combine information between two or more tables. You need more than one table to do this. So the first step would be to create two or more tables relative to your database.


To start, you need to Select the Database Tools tab in the Ribbon, in the Relationships command group and click Relationships.


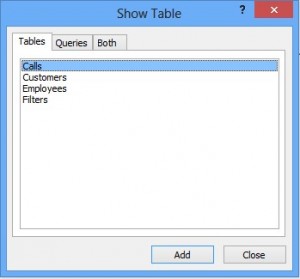
If you haven’t yet defined any relationships between your tables, the Show Table dialog box will appear automatically. To find Show Table dialog box however, all you have to do is click on the Design contextual tab, in the Relationships group click Show Table.


Once the Show Table dialog box appears, it will display all of the tables and queries in the database. To see only tables, click Tables tab.


Select one or more tables, and then click Add. For this example, we are looking at creating a relationship between Customers and Employees tables. Click Close when you are done.


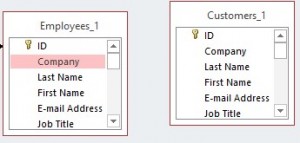
Drag a field (typically the primary key) from one table to the common field (the foreign key) in the other table. You can drag multiple fields by pressing the Ctrl key on your keyboard and click each field you want, and then drag them. You can do this between Multiple Tables to any field required.


Dragging from one field to the other is the easiest way of creating instant relationships.


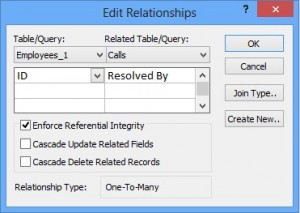
The Edit Relationships dialog box appears.


Verify that the field names shown are the common fields for the relationship. If you want to edit it or if a field name is incorrect or you have changed your mind, simply click on the field name and select the appropriate field from the list.


To enforce referential integrity for this relationship, select the Enforce Referential Integrity box. Note that Relationship Type appears at the bottom. Click Create New button to create more relationship and add the details in the Create New dialog box


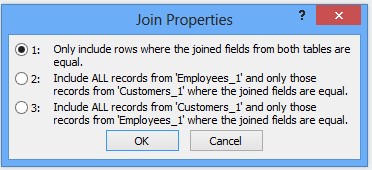
And if can set the Join Type by click the relevant button:


When you are finished in the Relationships window, click Save to save your relationship layout changes.


We hope that you found this tip insightful and helpful, if you would like any more access tip’scheck out our others.

Don’t forget to follow us on Facebook and Twitter

Microsoft Access Tips: Validation Rule

Access is designed for users to enter data into a database easily but sometimes people type in the wrong data and this can affect the tables and final reports.In this blog post we will be looking how to create a Validation Rule in Access 2007, 2010, and 2013.


To stop this you are able to implement Validation Rules to stop this from happening. The Validation Rule limits the values that can be entered into a field. So for example you are able to stop a number greater than 100 being entered in.


You can put a validation rule on any field in a table and this is found on the design view of that table, under the general tab.


Validation Rule 1


You can see there are 2 fields for Validation, Rule and Text. The rule is where you put in your “Rule” here are some examples below:


Rule Explanation
>30 Only numbers greater than 30
<20 Only numbers less than 20
Between 20 and 30 Numbers between 20 and 30


Validation text is where you put the text for the message box that will appear if the rule has been broken. This can be any message and you will always get a OK, Cancel Message box that will appear.


Validation Rule 2

Microsoft Access Tips: Adding Custom Shortcut Keys

Welcome to another Microsoft Access Tip. As we have discussed in previous articles, shortcut keys are a great way of saving time whilst working with different programs. In this tip, we will explain how you can add your own shortcuts to use to navigate your database


To assign a shortcut key to a field, follow these simple steps:


  • Edit the caption property of the label of the particular control you want to jump to, adding an ‘&‘ before the letter you want to act as the shortcut key.


For example, if you wish to be able to jump to a ‘Name’ field you could edit the ‘Name’ label accordingly: N&ame


  • In Form View the label will be displayed with the ‘a’ in name underlined: Name
  • Pressing ALT + A will switch the focus to the ‘Name’ field.


This technique can be used on any object that has a caption property and can make navigating your database a breeze.


If you would like to read about some of the keyboard shortcuts already available on Microsoft Access, take a look at our previous article: Speed up Access with Keyboard Shortcuts.


If you would like to read more tips, feel free to read our Microsoft Access Tip page.


If you would like to learn more about Microsoft Access, you should book yourself on one of our Microsoft Access Training Courses.