Archive for the 'Microsoft Outlook Tips' Category

Microsoft Outlook Tip: Setting Up a Meeting

Outlook is a great tool for not just sending and receiving emails, but for also incorporating your day-to-day happenings in the office. Calendar tools can help with setting meetings, appointments and plan your day.


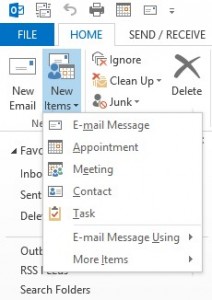
To set up a meeting in Outlook, go to the Home tab on the Ribbon, select New Items and then select Meeting.


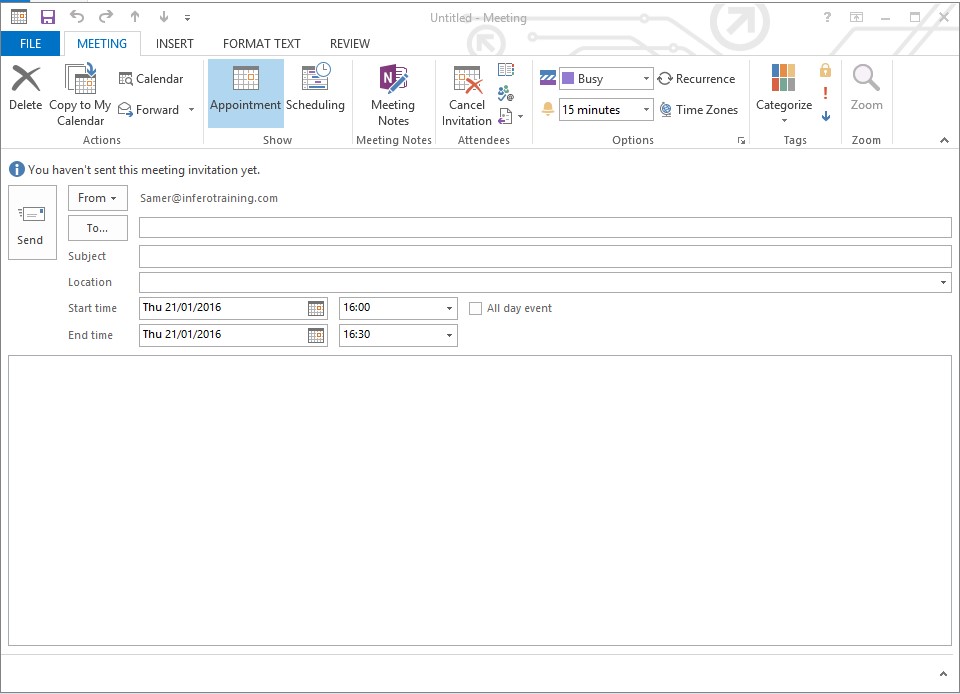
Once you do that, you will get the New Meeting Dialogue Box.


outlook.2


It is easy to invite people to a meeting by using the ‘To‘ box and adding a subject in the ‘Subject Box’. You can also schedule a time and date by adding them into the ‘Start/End Time’ box as shown in the picture above. It is also possible to schedule a meeting for the entire day, simple click the ‘All Day Event‘ button.


Fancy learning  more about how Outlook can benefit your business? Then have a look at our Outlook courses.


Let us know what you think and message us on Facebook and Twitter
Microsoft Outlook Tip: Creating Email signatures

In this tip, we will guide you on how you can create your own personal email signature which can be added to the end of each email that you send from Microsoft Outlook 2007 and 2010. A new start for a New Year!


Having a signature which contains your contact details means that the recipient is more likely to remember your details, especially if you have a healthy backward-forward dialogue going with them through emails. The recipient will also know who they need to talk with and their position within the company, ensuring that they are dealt with by the right person and in the most effective way.


Microsoft Outlook Tools


To set up your own custom Microsoft Outlook signature in 2007, follow these simple steps:


  • Select Tools > Options > Mail Format tab.
  • Click Signatures > and go to the E-mail Signature tab > New.
  • Type the new signature’s desired name.
  • Click OK.
  • Type the desired text of your signature under Edit signature.
  • You can use the formatting toolbar to format your text, or insert an image in your signature.
  • Click OK.


Email Signiture 1

To set up your own custom Microsoft Outlook signature in 2010 , follow these simple steps:


  • Select the Home tab > and click New Email.
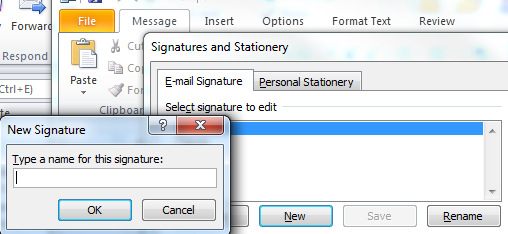
  • In the Message tab > Signature > and click Signatures.
  • This will bring up a Signatures and Stationery box.
  • Click New and type the name of what you wish to call your signature, and click OK.
  • Type the desired text of your signature under Edit signature.
  • You can use the formatting toolbar to format your text, or insert an image in your signature.
  • Click Save > OK.

Email Signiture 2


If you would like to read more Microsoft Outlook tips, please visit our Outlook Tips page.


If you would like to learn more about Microsoft Outlook, then you should book yourself on one of our Microsoft Outlook Training Courses. Just give us a call or drop us an email; we are more than happy to help!

Microsoft Outlook Tips: Auto-Replies

With how busy people are getting in the working day, sometimes it’s just too hard to reply to an email. Microsoft Outlook 07/10/13 gives you the opportunity to send an automatic reply if certain “rules” are met.


The first way to do this is by using the built in “Out of Office” feature. This only works when you are connected to a Microsoft Exchange Server account. To set up your Out of Office Feature you must do the following:


  1. Click File > Automatic Replies.


If you don’t see this command, you probably don’t have an Exchange Server account.


  1. Select Send automatic replies.


  1. If you want, select the Only send during this time range check box to schedule when your out of office replies are active. If you don’t specify a start and end time, auto-replies are sent until you select the Do not send automatic replies check box.


  1. On the Inside My Organization tab, type the response that you want to send to teammates or colleagues while you are out of the office.


  1. On the Outside My Organization tab, select the Auto-reply to people outside my organization check box, and then type the response that you want to send while you are out of the office. Select whether you want replies sent to My contacts only or to Anyone outside my organization who sends you messages.


You may not be using an Exchange server account for Outlook and if this is the case the above steps will not work. The steps below are how to create an Automatic reply using rules for Outlook.com (formerly Hotmail), POP3 and IMAP email address.


Firstly you need to create an email template.


  1. Click Home > New Email.

Auto-Replies 1


  1. In the message body, type the message that you want to send as your automated reply.


  1. In the message window, click File > Save As.


  1. In the Save As dialog box, in the Save as type list, click Outlook Template.


  1. In the File name box, type a name for your message template, and then click Save.


Now, create a rule to automatically reply to new email messages.


  1. Click Home > Rules > Manage Rules & Alerts.


  1. In the Rules and Alerts dialog box, click New Rule.


  1. Under Start from a blank rule, click Apply rules on messages I receive, and then click Next.


  1. Under Which condition(s) do you want to check?, check any criteria that you want, and then click Next. Typically, you don’t need to check any items.


  1. Under What do you want to do with the message?, check reply using a specific template.


  1. Under Step 2: Edit the rule description (click an underlined value), click a specific template.


  1. In the Select a Reply Template dialog box, in the Look In box, click User Templates in File System.


  1. Select the template that you created in the previous section or one that you have created or downloaded, and then click Open.


  1. Click Next.


  1. Check any exceptions to the auto-reply rule. It’s common not to add any exceptions.


  1. Click Next.


  1. Under Step 1: Specify a name for this rule, type a name for the auto-reply rule, and then click Finish.


Microsoft Outlook Tips: Redirecting Email Replies

When you are charged with sending e-mails for someone else in your office, you may not want the replies to be directed to you. For instance, your boss asks you to send an e-mail to a client after they have requested information about a particular service.


If the client sends chooses to reply to that email asking something which you have no knowledge of, you will then have to forward the e-mail to your boss and start acting as a middle-man in the conversation which could distract you from your other duties. So, to save time and resources, why not have the reply to this e-mail directed to your boss rather than you?


It is possible and extraordinarily easy to set up. Just follow the steps below to learn how:


  • Click the Options tab and select the Direct Replies To option in the More Options group.
  • From the Dialog box, set the reply to address for this e-mail.
  • Click OK.


Now you can send the e-mail on behalf of your boss, but the reply will go to your boss, and not you, leaving you free to get on with more important tasks.


If you would like to read more Outlook tips, please visit our Microsoft Outlook Tips page.


If you would like to learn more, you should book yourself on one of our Microsoft Outlook Training Courses