The purpose of your presentation will decide the presentation type most suitable for accomplishing your goals. Read on for the six types and when to use them!
We have previously discussed WHY presentation skills are important in business.
To summarise, a successful presentation relies on a person’s competency in several key skills, which include, but is not limited to, effective communication, stress management and adaptability.
However, like how ‘presentation skills’ incorporates multiple skills, there are also different types of presentation.
The presentation type depends on the subject matter, speaker’s goals and target audience.
The first step of preparation should involve determining what you wish to achieve with the presentation, which will help identify the most suitable presentation type.
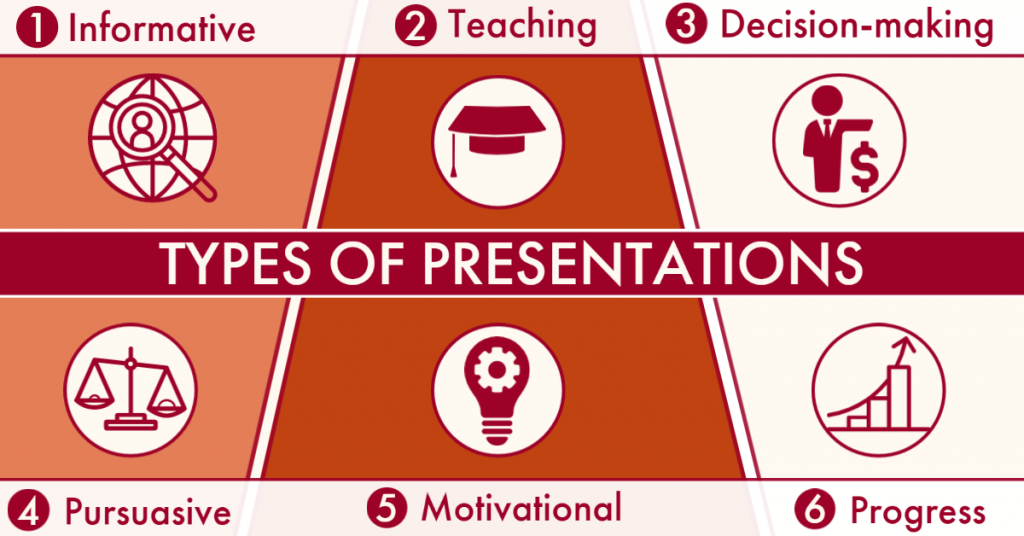
1. Informative Presentation
In business, informative presentations are likely the most used presentations.
Informative presentations aim to provide instructions, present new findings or convey information to a knowledgeable audience. They are concise and a more engaging version of a written report.
Example: A marketing agency sharing and summarising trends and engagement over the past month and how they compare to previous months and competitors.
2. Teaching Presentation
Teaching presentations are similar to informative presentations.
They both share audiences, but teaching presentations actively increase the audience’s own understanding of a specific topic and go into far greater detail.
Example: A company are switching to new computer software, so provide onboarding materials and training sessions to ensure employees can execute new processes, which expedites the transition.
3. Decision-Making Presentation
Decision-making presentations address a problem, the possible solutions and their various outcomes.
The idea is to suitably inform the It’sence and guide them toward a decision on moving forward. It’s an interactive way to fast-track decision-making and discover innovative solutions.
Example: An Operations Manager has found multiple software options to improve workplace efficiency; however, each comes with a trade-off. They compile different options and request the team’s opinions before coming to a conclusion.
4. Persuasive Presentation
Are you selling a product or pitching a business idea to investors?
You’ll likely use a persuasive presentation to convince the audience that they should be interested in what you have to offer and how you can solve their problem using evidence, logic and engaging materials.
Example: An employee meets their manager to invest in better recycling initiatives. They share pollution data and how new recycling bins might help prevent recyclable materials from being thrown into general waste.
5. Motivational Presentation
This presentation style should inspire.
Think YouTube videos and TED Talks. The point is to capture the audience’s imagination and elicit change or a call to action. Those listening should feel connected to and inspired by the subject matter.
Example: A team leader outlining the goals that the business wants to achieve and the fundamental role that team will play as a collective and individual to accomplish these goals.
6. Progress Presentation
Again, this presentation is similar to informative because it shares information but focuses more on timelines.
The objective is to share with colleagues how a project is progressing, are the deadlines being met, the status updates, or if there have been any obstacles or new avenues that should be explored.
Example: A freelance software developer is creating a new website for a company. They set up a meeting with the stakeholders to discuss a recent problem they’ve encountered, the cost it will incur, how they intend to mitigate it and the impact on the project’s timeline.
If you are interested in developing your presentation skills further, follow the link to learn more about our hands-on, comprehensive Effective Presentations Skills Course led by one of our certified instructors.
We would love to learn more about your training requirements, so please get in touch with us today at 0115 958 6699 or email us at info@inferotraining.com for more information and a free, no-obligation consultation.
Although ‘presentation’ or ‘public speaking’ strikes fear into the hearts of many, it’s a skill worth investing in to elevate your career. Read on to learn why.
What are presentation skills?
To begin, a presentation is:
A speech or talk in which a new product, idea, or piece of work is shown and explained to an audience.
Online dictionary
However, a person’s presentation skills are their ability to engage their audience in a compelling, engaging, educational and informative way. To do this, they must communicate clearly and effectively to various audiences.
It involves time management, body language, tone of voice, presentation materials and providing the opportunity for participation.
It’s a multi-tiered competency built on numerous abilities with one aim; to get the point across.
But why are presentation skills so important?
How would you answer if we were to ask you which careers you thought would require outstanding presentation skills?
The apparent answers may be high-flying entrepreneurs, politicians and TV presenters (or any profession with the word ‘presenter’ in the name).
The answer?
It’s closer to ALL of them.
Excellent presentation skills are essential, from nailing the interview for your dream job to leading a progress report to key stakeholders.
There is a good reason it’s ‘presentation skills’ plural. To successfully present, you are demonstrating to would-be employers, managers and colleagues an all-round competency in several skills:
1.Effective Communication
This is a given. A great presenter will be clear to prevent miscommunication and impart messages quickly and effectively to keep the audience engaged.
In this modern world, attention spans are short, so every word is a commodity.
2. Interpersonal Relationships
A presentation aims to build a good rapport and a two-way connection with the audience. Interpersonal skills are vital to establishing and managing relationships with people.
Understanding your audience will allow them to feel as if you are talking to them as an individual.
3. Organisation and Time management
A lot of work and preparation goes into preparing a presentation. You can achieve the output required faster by utilising a systematic approach without compromising quality.
A well-prepared presentation is more likely to captivate the audience’s attention and comprehension of the subject matter while staying within time constraints.
4. Research
During a presentation, you are trying to convince an audience why what you have to say is important.
An extensively researched presentation backed up with facts and figures to support your points is far more impactful and compelling.
5. Professionalism
A business relies on individual people to represent the company values. How you address people, whether during a conference or speaking to a customer, will create an impression of the business.
It is also a way to showcase yourself, your experience and your expertise.
6. Adaptability
Presentations involve an audience, and people are, by default, extremely unpredictable.
Responding to and improvising given unforeseen circumstances shows you can think on your feet when being addressed with an unfamiliar situation.
7. Stress management
There’s no getting away from it. We don’t all naturally have a gift for the gab, so presentations are one of the most dreaded business scenarios.
Getting past this and portraying yourself as calm and controlled shows you can manage stress and deliver under pressure which is an essential skill to have in the working world.
8. Resilience
You will not often hit the nail on the head with your first presentation, and it’s likely a skill you will develop over time. Listening to feedback and criticism will allow you to identify and overcome problems.
Resilience shows your ability to overcome challenges and treat setbacks as a learning opportunity to improve for the future.
The array of expertise required to present effectively is why it is the forefront soft skill essential to your career growth.
If you are interested in developing your presentation skills further, follow the link to learn more about our hands-on, comprehensive Effective Presentations Skills Course led by one of our certified instructors.
We would love to learn more about your training requirements, so please get in touch with us today at 0115 958 6699 or email us at info@inferotraining.com for more information and a free, no-obligation consultation.
In 2019, 20 companies alone were responsible for producing over HALF of the global single-use plastic waste.
Given the current environmental crisis, this is not a top 20 list that any company wants to find itself. This article discusses how to rank at the bottom of this undesirable list and why you’d want to.
Don’t Let Plastic-Free July Pass You By
Plastic-Free July is an annual global campaign initiated by the Plastic Free Foundation, an organisation dedicated to creating a world free of plastic waste. Throughout July, millions are refusing single-use plastics in a bid to decrease the quantity of plastic waste occupying landfill sites and polluting our natural world.
Before we jump into what you as an employee or business can do to minimise plastic waste, it is essential to understand why this is so important.
(Or, if you’re already up to date, click here to see the steps that you as a business can take to reduce plastic waste)
The Problem With Plastic Production and Plastic Waste
1. Green House Gas Emissions
This July, the UK reached a temperature of 40.3 degrees Celsius. The highest temperature ever recorded in the UK, and the first time it exceeded 40 degrees Celcius.
With only around 0.5% of homes in the UK having air-con, it was a very physical reminder of global warming and climate change.
Global warming and climate change result from greenhouse gas emissions blanketing the Earth and preventing heat produced by the sun from dissipating into space. The primary source of this phenomenon is the carbon dioxide and other gases released from burning fossil fuels.
Although it isn’t widely known, fossil fuels are the building blocks of 98% of plastics.
From start to finish, plastics increase greenhouse emissions:
Extracting and transporting fossil fuels to create plastics
The process of refining and manufacturing plastic
Incinerating plastic waste and unmanaged plastic waste degraded by the sun
In total, plastics contribute to around 3.4% of worldwide greenhouse gases.
As well as contributing to greenhouse gases, plastic waste is one of the most damaging environmental pollutants.
2. Environmental Impact of Plastic Waste
Since 1950, humans have manufactured an estimated 9 billion tons of plastic. However, of this, we have only ever recycled 9%.
Recycling rates have improved over the last couple of years, but they’re still far from ideal. Of the 360 million tons of plastic produced annually (roughly the weight of the entire human population!):
16% is recycled
19% is mismanaged
25% is incinerated
40% goes to landfills
Waste which is mismanaged and goes to landfill sites uncontrollably leaks into the environment, causing catastrophic damage to wildlife and their habitats.
At least 14 million tons of plastic waste enter our oceans yearly, causing immense harm to marine life and vital ecosystems.
For wildlife, if consumed directly, plastics can gather inside their bodies and cause health issues such as fatal intestinal blockages. Animals have also been trapped and asphyxiated by plastic packaging with rings designed to hold food and drink cans together.
Without help, plastics also do not break down; they only break up, degrading over time, becoming microplastic fragments, less than 5 millimetres in length or roughly the diameter of a pencil eraser.
Tiny and inoffensive, microplastics are easily mistaken for food by wildlife and eaten. In this way, microplastics become a part of our food chain and diets. They are also found in the air we breathe and in our drinking water.
There is little evidence available for the risk to human health from microplastics; however, we do know that plastics contain chemicals that can cause hormonal imbalances, reproductive problems and cancer.
Given the association with the climate crisis and the environmental impact, does plastic use warrant planetary abuse?
3. Single-Use Plastics
Around 50% of the 360 million tons of plastic produced is for single-use items. Companies design them for the sole purpose of being used once and then promptly discarded.
Single-use plastics can serve practical and essential purposes. For example, in healthcare, single-use plastics assist by preventing cross-contamination and infection. However, this only accounts for around 4% of plastic waste.
Packaging accounts for 40%—easily the most significant contributor.
Single-use plastics are a symptom of convenience and waste culture. It’s a versatile, lightweight, moldable, and moisture-resistant material perfect for storing and transporting goods. Inexpensive and disposable, we see them everywhere. It shouldn’t be surprising that packaging is the greatest cause of plastic waste.
Our reliance on plastics is entirely unsustainable, which is why the awareness created by campaigns like plastic-free July is so important.
The use of plastic is a large part of company culture and ingrained into processes, but there are small steps a business can take to minimise its plastic footprints.
The Solutions for Plastic Production and Plastic Waste
1. Plastic Waste and Consumption Postmortem
While demand for plastic still exists, production will not decrease, and the expansion of petrochemical industries.
The pathway by which plastic flows through your company should be known and quantifiable, so cost-effective alternatives that serve the same purpose and reduce planetary impact can begin replacing or minimising the need for plastics.
It is also worth researching new and current suppliers before making further purchases or partnerships to ensure that your sustainability values align.
Requesting sustainable alternatives encourages other companies to adapt to meet consumer requirementsand contribute to the total reduction of plastic production and waste.
In terms of physical company waste, don’t worry; deep dustbin diving isn’t required. However, knowing the main contributors to company plastic waste is helpful.
For example, are they supplied internally, such as eating utensils and plastic cups? Ask whether or not any single-use items are essential or if a more sustainable option could replace them. How much waste is packaging, and could items be purchased without it, or would bulk buying reduce plastic packaging.
Not only will this help the environment, but it may also save money.
Reusable items reduce the need to replace or buy new stock continually. Cutting down on the amount of waste created may also lessen the cost of disposing of plastic at recycling or landfill sites.
2. Educate, Inspire and Persuade
For new sustainable policies to work, they must be adopted and embraced by all staff members.
Outside training and courses are a great way for people to learn and understand why new initiatives are so important to combat sustainability issues and how, as an individual, they are contributing to reducing the company’s plastic footprint.
Monthly challenges are a fun way of creating a more eco-friendly workplace.
It could become a team-building exercise where different facilities face off to reduce their plastic waste or a reward for achieving new sustainability targets – anything from a small prize to a bonus to celebrate their success.
It is also an opportunity for everyone to get involved, and people should be encouraged to participate, think and voice their suggestions.
Creating eco-habits and awareness in the workplace may also come with the added benefit of taking sustainable behaviours and commitments home, leading to the reduction of single-use plastics in day-to-day lives.
Concern over plastic pollution is only growing with consumers beginning to favour businesses taking an active stance to minimise waste. Sustainable practices will onlyraise business social and PR profiles and recognition among new audiences.
3. Provide the Right Recycling Utilities and Materials
A significant source of plastic waste is plastic bottles and food packaging.
Many informative posters and resources are readily available on the internet that perfectly summarises and raises awareness of waste and how small changes could not only help the environment but also save money by investing a little time and money into alternatives.
For example, infographics that show the statistics for the average number of water bottles per person that enter the sea every year, and the cumulative cost, compared to swapping to reusable water bottles.
Or how much single-use packaging is created from shop-bought meals, which could be avoided or at least controlled by bringing in homemade lunches.
Recycling bins should also be readily accessible and easy to use.
Posters and signs are a great way to continually reinforce sustainable workplace habits. You can use signposts to show where the nearest recycling points are to avoid rubbish ending up in general waste or getting rid of individually placed waste bins altogether.
Many people know that recycling plastics is important, but a lot of confusion still exists because not all plastics are recyclable. The outcome? Improper use of bins and recyclable materials still finding their way into incinerators and landfills.
Posters at keys location are helpful resources to show what can or can’t be recycled. Providing pictures and information about the correct bins to use helps prevent any uncertainty and more efficient use of recycling initiatives.
A Final Note
Although the facts and figures are alarming, we hope this blog leaves you feeling encouraged.
Environmental problems, global warming and climate change can feel like impossible crises.
Like anything, tackling the issue head-on and breaking it into smaller, achievable parts is the key to success.
There are small proactive things we can all do personally and professionally that will make a massive impact on the planet.
Times of change are also times of ingenuity, growth and opportunity. Lead the way and pave a better future instead of waiting and following in its wake.
Last Friday was National Take Your Dog to Work Day! But what can you do on the other 364 days of the year when this isn’t an option?
National Take Your Dog to Work Day was established in 1999 by Pet Sitters International to help maintain the bond between owner and pet during the average working day. (It was also a very clever ploy to encourage people to adopt a furry friend after interacting with them in person…)
Instances of dogs being introduced into the workplace and on university campuses have only been increasing after it was proved that pets help reduce stress and anxiety in the workplace and improve the owner’s mental health.
It’s probably no surprise then that throughout the Covid-19 pandemic, many people found comfort and companionship by introducing a pet into their homes. Our 4-legged companions eased the isolation and inactivity of enforced lockdown and furlough or working from home meant being around to make the commitment.
The PFMA (Pet Food Manufacturers Association) has confirmed that 3.2 million households in the UK acquired pets over lockdown, with over 12 million dogs now in homes around the UK. In 2019, this figure was 6,702,000, so the number of dogs in homes has nearly doubled over the pandemic.
However, life has returned to some semblance of normality. Whether we feel joy or exasperation at rejoining the working world, we probably feel united in our relief that Covid-19 restrictions are all but non-existent.
But it begs the question, what about our furry friends?
During the pandemic, every day was ‘Bring Your Dog to Work Day’ until it wasn’t. Suddenly the routines changed, and we were no longer constant companions to our pets.
Here are some tips to help your pet adjust to the routines of working life:
1. Create a morning routine
Pets – dogs especially – tend to be highly social creatures, bonded to their home pack, and sudden, prolonged absences can be distressing. Before starting work, it might help to go through your average, morning routine and then shut yourself in a room. This mimics leaving the house and allows your pet to experience being left alone for short periods and then reassured that you will return.
It’s also an invaluable opportunity to see how your canine friend copes with your absence. If the doors and floors have been scratched, or there are sudden house training regressions, this is a sign that your canine friend is stressed, and it may be worth consulting a vet or behaviour expert.
2. Morning walks
It is always a good idea to let your dog have a big ol’ run around at the start of the day. Unless you are within walking distance of work, there will be no lunchtime strolls. The mornings are essential for spending time with your dog and ensuring they’ve done their business before going to work. The exercise will tire them out and calm them down!
3. Relaxing music and a place to stay
Pet terrier asleep between bedding at home
This one is again about building routines. Some dogs need to have a place entirely their own filled with blankets, dog-safe toys, and freshwater close by. Leaving the radio on a relaxing music channel for your pet can also help combat separation anxiety and create a reassuring routine (thoroughly recommend classical FM). The music continues, and the pack separates for a while, but everyone returns.
4. Are you not entertained?
Some behavioural problems in dogs stem from boredom, especially if left alone. Toys (indestructible!), healthy chews, controlled food-dispensing toys, and a window with a view can all help mitigate your dog’s destructive tendencies. If the toys have been left untouched, you may need to find something more stimulating. Still worried about what they’re getting up to? Some user-friendly pet gadgets are available now to see what havoc is being wreaked in your absence or just to say a quick hello and interact with your dog from anywhere.
5. Rome isn’t built in a day
The key is taking the time, patience and preparation to put all the above into practice. Despite how much time you may think you will have with your dog, as we discovered over the past couple of years, life can change quickly. It is important to start ‘daily life’ routines early on and keep to these to secure your pet’s routines and their place in the family pack and reduce the risk of separation-related behavioural problems later on.
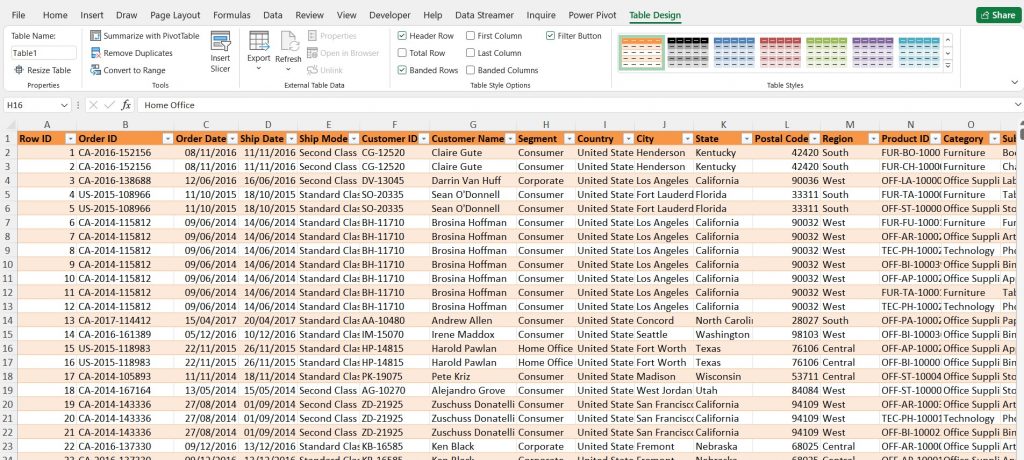
It’s a good question. Excel is another multipurpose tool that has made its way into both our personal and professional lives due to its wide variety of applications and powerful functions. With over 750 million users, it is one of the most popular software applications globally.
Excel is a spreadsheet program created by Microsoft and is available as part of the Microsoft Office Package. The spreadsheet is compiled of boxes called cells, which hold data organised into columns (cells going down the way) and rows (cells going across the way), creating a sheet (hence spreadsheet). It allows us to not only store data but also display and organise this data in a clear and understandable format.
Is Excel worth learning?
As a prominent workplace tool and with many employers expecting Excel as a base skill, you will likely come face to face with Excel in your career, whether this is data entry and storage for the future, or perhaps creating a dashboard from scratch. Learning the basics will allow you to confidently approach this eventuality and avoid feeling like a deer caught in the headlights.
Additionally, it is a transferable skill applicable to many industries and even your personal life! (Anyone sheepishly reading this and thinking of the 100’s of excel sheets you have dedicated to comparing products?… You’re not alone.)
What can Excel actually do?
So now that we’ve established that excel is worth learning, what can it actually do?
Make tables and databases
This might be the most apparent function and, therefore, the best place to start. Data is inserted and stored in cells where it can be visually grouped and analysed. Tables allow us to distinguish and organise data into meaningful categories. Otherwise, we have a chaotic jumble of information with no discernable relationship.
Once the data is inserted into a table, we can format the table’s design, create filters to hide or search for specific information, and rows and columns can be easily added or removed.
Convert data into graphs and charts
Now that the data is arranged into tables, excel has graphical features that allow us to represent this data in graphs and charts. Graphs and charts enable us to better understand the data quickly due to their more simplistic display of the information. They are especially useful for extensive data where relationships and patterns are harder to see.
Functional features
Not only can we represent data in graphs and charts, but we can also perform complex calculations with the data. This is especially useful for totalling 100+ columns and manipulating large sums of data. The alternative is the painstaking process of doing everything by hand…Excel will do this for you quickly and correctly.
And that’s why Excel is your friend!
Microsoft Excel is an incredible tool that specialises in improving efficiency and saving time. It may seem like a steep learning curve but with 750 million-plus users, we can safely assume that the benefits outweigh the trepidation of getting started. It is a lot simpler to use, and with an easy goal in mind, you’ll quickly get to know the layout and the promise of a more organised existence.
Feel like you need a bit more support getting started? Check out our comprehensive Excel Introduction Course, led by a Live Trainer who will support you at every step of the way!
Being a good leader is difficult. Most of us, during our working lives will have many managers and supervisors. Of these, those that we might consider really good leaders might be quite a small number. Leadership, however, like anything else, is a skill that can be learned. Becoming a good leader can have a massive impact on the success of both your own team and that of your organisation. Here are some of the ways that you can improve your supervisory skills:
Connect with your team
Leading a group of people requires a mutual sense of trust and understanding between the leader and their team members. To achieve this, leaders should learn to connect with each team member individually.
Try focusing on getting to know them as a person; their personality, interests, strengths, weaknesses and their motivations. This understanding will enable a manager to help develop team members and increase their autonomy in areas where their skills are high. This in turn will increase the employee’s engagement, motivation, investment in, and trust of, you as a leader.
Encourage professional and personal growth
It is probably already part of your Job, but acting as your team’s champion is a vital part of being an effective leader. You should be completely invested in their success and growth both professionally and personally.
This makes complete sense, because, as a leader your job is to get the very best results you can out of your team. By giving employees the opportunity to learn and develop, to upskill and move into new areas, you will increase their satisfaction, work-rate and buy-in. The old adage goes that if you, as a leader, are the smartest person in the room, then you are in the wrong room. Be the best leader and developer of people in the room. Let your team be the best at everything else.
Keep a positive attitude
As much as leaders wish their team’s day-to-day operations could run smoothly all the time, things will go wrong. Human error, unforeseen occurrences and outside forces can all, potentially, put things off track. Whether it is a minor miscommunication or a major incident, how you respond to the issue is key. Negative situations will have an effect on everyone, including you as a leader and on your team, but it is your job to remain calm and positive, even if you don’t necessarily feel that way at the time. This is exactly when your team will look to you to tell them what to do. You need to do that as effectively and positively as possible.
Give direct and honest feedback
It’s important as a leader that you give honest feedback. It is the best way to guide your team in the right direction. Again, it may be part of your job, but you need to ensure that you are constantly and regularly providing constructive feedback and performance reviews. Obviously, to give correct feedback to your team, you need to know exactly where the business is headed, it’s goals and how your own team fits into them. Part of feedback is making sure that your team also know what it is that your organisation is trying to do. The fact that they are not meeting goals might just be because they don’t understand this correctly. If you’re not direct, people won’t understand where they are not meeting set standards and won’t be able to improve
Remember to also highlight employee accomplishments. Celebrate if a team member does something great and let them know. Positive recognition has been shown to improve engagement and productivity.
Be open to new ideas
Good leaders have the emotional intelligence to understand and accept that change is inevitable and that their team may have a different way of doing things, a method which could be more effective than their own. Remember, you don’t have to be the best at anything, apart from being the best leader. Always actively encourage innovation and better work practices suggested by your team. That is what a good leader does.
Encouraging your team members to provide their insights and ideas will increase their engagement and commitment and make them work better and smarter. Remember that you are not judged by what you, personally, accomplish as a leader, but by what your team can achieve.
For a more in-depth look into how to develop your leadership skills to gain the most of your team, consider checking out our leadership courses for the best insight.
May is Global Employee Health and Fitness Month, which emphasises looking after yourself, both physically and mentally. Something that will be of benefit both at work and in all other parts of our lives.
History
We all know that maintaining our health and fitness will improve the overall quality of our lives, but as we grow older, we can get stuck in our routines and habits, whether they are good or bad, and it’s easy to neglect our mental and physical well-being. This is one of the reasons that the Global Employee and Fitness Month was launched in 1989, to provide an opportunity for workers to reflect on their lives and inspire employers to come up with new, innovative ideas to motivate employees around the world to improve their health and fitness.
As the Global Employee Health & Fitness Month (GEHFM) says on it’s website:
“Global Employee Health & Fitness Month is an international observance of health and fitness in the workplace. The goal of GEHFM is to promote the benefits of a healthy lifestyle to employers and their employees through worksite health promotion activities and environments.”
The role of employers is emphasised, as they are the ones who create the initiatives, to not only spread awareness of how essential good health is, but to also urge their employees to participate in projects and activities that have real physical and mental health benefits. It is not just employers who get involved in the month, however. Universities, local governments, hospitals, and health departments also play a great role in the successful celebration of this month.
How to Observe
Arrange a yoga session at your workplace: There are many forms of exercise that can help both physically and mentally. Yoga is one of the oldest and most proven. Perhaps arrange a yoga session in your work place, or, if you work from home, set aside half an hour for some yoga yourself. It can definitely help your body, but might also bring some peace to your hectic day.
Host an event with a variety of physical activities: If yoga isn’t your thing, persuade your employer to host an event with trials of many activities, such as swimming, running or weight lifting. The broader the options the better and the more people who are likely to get involved.
Bike to Work Scheme: Many companies have a bike to work scheme, which can benefit both employees and employers when the latter choose to cycle rather than drive to work. Whilst the health benefits to employees may be self-evident, Employers who have started such a scheme have reported less sick days amongst those who cycle, a lower carbon footprint; with the added financial incentive that employers can save up to 13.1% in NI contributions.
A Healthy mind is a productive mind: Living a healthier lifestyle, through a balanced diet and exercise will almost certainly mean an improvement in mental wellbeing, which can itself lead to a more productive lifestyle. Regular exercise can release dopamine, a chemical than makes us feel happier and satisfied, an important factor in regards to how hard we work.
Improving your health can make you less stressed: Sustained exercise will increase blood flow and pumps up endorphin production, the body’s natural painkillers, directly linked to reducing your stress. Being stressed can lead to de-motivation and burn-out, so adding a short exercise to your daily routine could really make a difference in both your work and home life.
Becoming energetic and motivated: Since exercise and healthy food provide energy, you are much more likely to be motivated to take on new projects and follow them through. If you need help with time management to help fit in extra time for your fitness and well-being, check out our Time Management courses.
It may have escaped your attention, but it is now possible to insert 3D models into Office documents. The feature is available to Office 365 subscribers and to anyone who has the 2019 or 2021 Desktop versions of MS Office and it allows the easy insertion of 3D models into any PowerPoint, Word, or Excel file.
Key Features of 3D Models
3D objects can be moved and resized in the same way as images, but can also be rotated along 3 different axes using a very simple control.
3D models can be animated within PowerPoint using aminations like Turntable, Swing and Jump & Turn
If the same 3D object is used on consecutive slides in PowerPoint and combined with a Morph transition, the object is animated in 3D.
It is very easy to get a 3D model into your Word Document, PowerPoint Presentation or Excel Workbook. On the Ribbon at the top of any of the applications, simply click on the Insert tab and look for the Illustrations group, which is on the left-hand side of the Tab.
Although the Illustrations group is configured slightly differently, in Word, Excel and PowerPoint, this is always where you will find the 3D Model command.
Once the 3D object is inserted, manipulate the built-in tools to allow you to easily rotate, flip, spin, pan, and zoom for ideal placement.
3D Models in PowerPoint
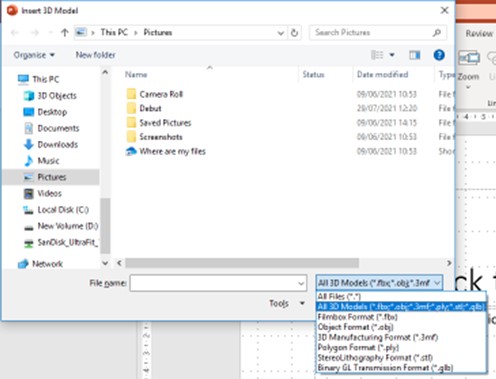
Since you are most likely to use 3D Models in PowerPoint, we will concentrate on that, but inserting and manipulating 3D models in any of the other Office programmes will work in exactly the same way. Just follow the same steps that you would use to insert photos or videos in PowerPoint. Go to Insert → Select 3D Models and from the drop-down menu, choose how you want to insert a 3D file.
If you already have a 3D model that you have created or downloaded, then you can use the This Device option. A number of different 3D file formats can be inserted into PowerPoint slide. Just select the format that your 3D model is in.
Select the format that your 3D model is in.
If you don’t have an existing 3D Model, then you can opt for the Stock 3D Models command, where there are many options of pre-existing models. You can even search for exactly what you want.
Once the 3D model is inserted, rotate the model to the angle that you wish it to appear on the slide. This is done by clicking on the 3D model itself, which will cause a 3D rotation control to appear at the object’s centre, which can then be used to rotate the object as you wish. You can still use the normal rotation handle at the top of the object to rotate your image clockwise or counter-clockwise, but you’ll get a much better experience using the 3D rotation control.
3D Model in Various Views
Any 3D object can be moved, resized and aligned just like a normal picture, shape, icon or any object that is normally inserted into a PowerPoint slide. It isn’t yet possible to edit the 3D models themselves within PowerPoint, but if you have Paint 3D, it can be done with this programme.
When a 3D model is selected a 3D Model contextual tab appears on the Ribbon.
This includes options to reset the model, switch it to set views and arrange it relative to other objects on the slide. There are also controls for sizing the object including Pan and Zoom.
3D objects are very easily inserted into Slides and have multiple uses.
Improving your communication skills is advantageous to you and everyone around you. Good communicators are seen as confident and trustworthy and these skills can help in both your professional and personal life.
Here are 6 ways that you can improve your communication skills:
Listening Effectively:
This is one of the most important, yet overlooked, aspects of communication. It is natural to try to think of a response to the other person while they are still talking, but taking time to let them finish and trying to fully understand what they are saying can pay dividends. If you are unsure about something that has been said, ask for clarification, or for the person to repeat their point again.
And when listening, stick to one communication at a time. It’s always tempting when speaking to someone on the phone, to, perhaps, respond to an email at the same time. But it is very likely that you will miss something the other person is saying. Trying to do both things at once may mean that you end up doing neither of them particularly well.
Body language:
This is something that we all are aware of, but which, surprisingly, most of us still don’t think about when we are communicating. A few simple things in this area can make a great deal of difference in our communication with others. Don’t cross your arms, keep eye contact, sit up straight so you look professional and be as open as possible. We don’t have to be body language experts to use it effectively in communication.
Be Concise
In written and verbal communication, try to be as brief and concise as possible, whilst still conveying all the information required. Try not to ramble or go into areas of information that are just not needed.
Maintain a positive attitude and smile:
This one is simple. Smile and be positive. Smile even when speaking on the phone, because the other person will know it. Smile often and exude a positive attitude and people will respond positively to you.
Empathy:
Being able to understand the feelings of those around you is an integral part of being an effective communicator. Empathising means both understanding and relating to someone else’s feelings. Having high emotional intelligence and demonstrating an ability to empathise builds rapport between you and others and increases your ability to communicate.
Practice public speaking:
Public speaking may sound daunting, but there’s no better way to develop good communication skills. Good communicators are able to clearly articulate their feelings, whether speaking to a large group or talking face-to-face with one other person. Speaking in front of a group will highlight your strengths, as well as letting you know those areas that you need to improve on.
Our course in Advanced Communication Skills will show you how to apply advanced verbal and written communication techniques in your workplace.
It’s widely believed that our memories get worse at we get older. However, whilst it is true that the aging process causes changes in our brains that can mean that it takes longer to learn and recall information, we shouldn’t mistake this for true memory loss. It is normal to forget things once in a while as we age. But, however old we are, there are many things we can do it in our day-to-day lives to help keep our brain working at full capacity.
Here are five ways to help keep your memory sharp:
Sleep
Sleep is proven to be one the most important factors in having a good memory. It is during sleep that our brains perform the consolidation processes required to do things such as moving remembered events from short term to long term memory. Lack of sleep may cause issues with retaining new information and even make you struggle to recall information laid down in the past.
Research also suggests that getting a good night’s sleep before learning is also very advantageous, since sleep deprivation can affect our brain’s ability to memorise and consolidate any new information. Remember, before your next class, seminar or training day, try to be well-rested, as it will help you more than you think.
Exercise
Studies in human brains show that regular exercise can improve our memory. Fitness amongst older adults has even been shown to help to slow the decline of memory. Exercise is also helpful with spatial awareness, which will also improve your spatial memory. Spatial memory is the storage and retrieval of information within the brain needed to plan routes and to remember where objects are located.
The health benefits to exercising regularly are well known and documented, but regular exercise is shown to improve other cognitive abilities besides memory, so whilst you’re improving your health and your memory there are many other benefits.
Meditate
Regular meditation increases blood flow to the brain, which in turn strengthens the network of blood vessels in the cerebral cortex. This reinforces our memory capacity. A particular study has indicated that meditating for just 20 minutes a day boosts memory and concentration. Meditation can particularly help working memory, which stores information temporarily for short term use.
Research shows that participants with no experience in meditation can improve their memory recall in just eight weeks. As meditation also helps with concentration, it has been shown to improve test scores.
Test Yourself
Testing yourself can help your ability to retain information, since any re-visiting and repetition of a subject will always help to embed the knowledge. Ask a friend to test you or see if there are any online resources that will check your knowledge
Doing this you can consolidate your knowledge of a topic or area and transfer your learning to long-term memory, which will happen if you continue to actively use the information. As a bonus, it also helps you know what you don’t know and to determine which areas you need to revisit.
Write it down
Writing down new information is a practice that many people use to retain information. This works because writing by hand turns on parts of the brain involved in learning and memory. Taking notes by hand, rather than even using a keyboard, may boost how well new information is retained.
Studies have shown that writing notes by hand is much better for long-term memory of ideas, or conceptual information. This is vindication for all of us who have ever said “I remember it better when I write it down”.